
Sunday, July 7, 2013
Chili Pizzelles
My neighbor told me that there was a cookie contest at the fair and I decided to give it a shot and enter. The rules asked for an original recipe, so I put my thinking cap on and got to work. After many test ideas and feedback from my neighbor, I decided to enter a chili powder pizzelle. Pizzelles are Italian cookies made in a press similarly to a waffle cone. Typically they are anise flavored (black licorice). I added enough chili powder to a normal recipe to get the flavor to pop. I nervously entered the contest and hoped for the best. I wandered around the fair and returned to hear the judgement. It was at this time that I noticed that all the judges could be classified as senior citizens and would most likely not like something that didn't taste traditionally sweet and yummy like a chocolate chip cookie. Alas, I was unsuccessful, but the experience was well worth it. I will definitely look into doing it again in the future. As for my recipe, just add two tablespoons of chili powder to a basic pizzelle recipe and don't add in any anise extract. Also, I waited until all but the last cookie was eaten to take a picture, so it unfortunately is a bit broken for this picture:


Saturday, April 6, 2013
French Macaroons with Raspberry-Rose Buttercream from Bon Appetit
With macaroons becoming more and more popular, I decided to give it a shot after my mom showed me the French Macaroons with Raspberry-Rose Buttercream recipe from her Bon Appetit magazine. If you are interested in the recipe, you can get it here: http://www.bonappetit.com/recipes/2011/01/french_macaroons_with_raspberry_rose_buttercream


Macaroons are pretty much fancy sandwich cookies. They are made with almond flour and are fussy, but delicious.

Almond flour is just finely ground almonds. You get a batter like this that you then pipe out into dots on a cookie sheet.

If you've ever made meringue cookies, it's a similar process. However, the baking process is fussy and you need to be by the oven to make adjustments often.

After baking the cookies I made the filling for the recipe. One part of the filling is making raspberry jam. If I make this recipe again, I would probably just go buy some jam as I didn't think mine tasted too different and it would save on the time that it takes to make these cookies.

I ran into a snag with the rose buttercream. I couldn't find any rose water, so I'm not sure how that would have changed the taste. I was skeptical about the frosting since you have to heat it over a water bath and I was sure the eggs in the recipe would curdle. I was wrong and it comes out as a smooth frosting that even with the addition of the jam tasted to me like a fancy butter spread that will be going on some waffles in the near future to finish up the leftovers from the recipe.

The next part is the assembly. I tried to match up all the cookies since my hands aren't steady and I don't have the practice and finesse of a professional baker to ensure equal sized cookies.

Next I applied the jam to one side of the cookie. I also don't think I cooked my jam long enough, because it stayed runny. I also would probably just strain all the seeds out, because I'm not a fan of them, but it isn't a critical thing for the recipe.


Then the frosting was spread on the other half of the cookie.


And then after putting the two together, a marvelous macaroon was created.

Because of the piping method for creating the cookies, I made exactly the three dozen cookies that the recipe said it would make (I usually make my cookies too big and end up with significantly less).

And then I got to indulge in the tasty treats. They came out delicious, but the amount of work that went into them makes me hesitant to try them again. However, I was really pleased with the cookie part which is plain, so I think I'll make those again and maybe try some different filling combinations.

The one bad thing about macaroons is that they do not hold up for a long time. I kept mine in an airtight container in the fridge, but the liquidy jam I made had them getting softer after a day. I'm not sure how well they would have lasted after that, because they were all eaten.
Friday, March 1, 2013
Pillsbury Funfetti Brownie Pops
So this post is sort of a product review, but also my first foray into the world of cake/brownie pops. I know they have gained in popularity, but I never really understood the appeal of them. It just seemed like a lot of work for not a lot of payout, but I can see them as an easy way to have a decorative dessert at a themed party if you're willing to put in the time and extra money to get the supplies. With that in mind, I avoided them until my mom bought me this ready to go package from Pillsbury.

The nice thing about the package is that they provide the sticks and everything you need to make it other than a pan to cook the brownies in. This appealed to me, because I know I'm not going to go out and buy the special cake pop cooker and only special parties or projects send me to a store where I can also get the pop sticks.

I followed the directions and you pretty much bake the brownies, and cut off the evil crust to leave the yummy gooey soft center part. Yes, I am not a fan of the edges of brownies and if you are, then you could have easily eaten the edges if you were here when I made them.

Then you cut them into twelve pieces. It was at this point that I realized my brownie cutting abilities are about the same as an eight year old child, although that child would probably cut them straighter than me. It was also at this point I realized my pan was 9x9" instead of the 8x8" the instructions called for. This just meant I really had to roll my brownies into balls to get them to work.

After rolling, you use chocolate to adhere the sticks to the brownies and let them chill in the fridge. This is another reason I wasn't too interested in cake pops due to the extra wait time you have to put in, but it is necessary.

So then they look like the one with the stick in it and are ready to be coated with chocolate and sprinkles.

I got my chocolate and sprinkles ready to go. The package reminds me not to overheat the chocolate, which I already knew not to do after having some previous disastrous results when trying to chocolate dip strawberries. If you aren't aware of the consequences, the chocolate clumps and becomes a hard chalky/clump mess. Anyway, I wasn't sure the best method for sprinkle adhesion, so I made it dip-able.

The chocolate hardens fast due to the thermodynamics involved in placing warm chocolate on cold brownies, so get those sprinkles on fast.

They came out pretty delicious, so I can understand more of the appeal to them. They seem like they are easy to customize and chocolate coated brownies are just an amazing product. My only criticisms is that it is a lot of time for so few, so I would make larger batches if I was going to do this. Also, for people really interested, a foam block would make drying the chocolate easier. That being said, if I was still 8 I would beg my mom to buy these all the time. As a much older than 8 year old, I can see these as a good party food with a lot of design potential.

The nice thing about the package is that they provide the sticks and everything you need to make it other than a pan to cook the brownies in. This appealed to me, because I know I'm not going to go out and buy the special cake pop cooker and only special parties or projects send me to a store where I can also get the pop sticks.

I followed the directions and you pretty much bake the brownies, and cut off the evil crust to leave the yummy gooey soft center part. Yes, I am not a fan of the edges of brownies and if you are, then you could have easily eaten the edges if you were here when I made them.

Then you cut them into twelve pieces. It was at this point that I realized my brownie cutting abilities are about the same as an eight year old child, although that child would probably cut them straighter than me. It was also at this point I realized my pan was 9x9" instead of the 8x8" the instructions called for. This just meant I really had to roll my brownies into balls to get them to work.

After rolling, you use chocolate to adhere the sticks to the brownies and let them chill in the fridge. This is another reason I wasn't too interested in cake pops due to the extra wait time you have to put in, but it is necessary.

So then they look like the one with the stick in it and are ready to be coated with chocolate and sprinkles.

I got my chocolate and sprinkles ready to go. The package reminds me not to overheat the chocolate, which I already knew not to do after having some previous disastrous results when trying to chocolate dip strawberries. If you aren't aware of the consequences, the chocolate clumps and becomes a hard chalky/clump mess. Anyway, I wasn't sure the best method for sprinkle adhesion, so I made it dip-able.

The chocolate hardens fast due to the thermodynamics involved in placing warm chocolate on cold brownies, so get those sprinkles on fast.

They came out pretty delicious, so I can understand more of the appeal to them. They seem like they are easy to customize and chocolate coated brownies are just an amazing product. My only criticisms is that it is a lot of time for so few, so I would make larger batches if I was going to do this. Also, for people really interested, a foam block would make drying the chocolate easier. That being said, if I was still 8 I would beg my mom to buy these all the time. As a much older than 8 year old, I can see these as a good party food with a lot of design potential.
Sunday, February 3, 2013
Black Magic Cake (Orange and Chocolate deliciousness)
This is my absolute favorite tasting cake ever. It is a mix of orange and chocolate and deliciousness. The basic recipe (although slightly more complicated) is to marble a chocolate cake mix with an angel food cake mix that had orange juice added to it and then cover it with orange butter cream frosting and a chocolate ganache top.


Here it is in it's majestic outside. You can see the smooth chocolate ganache waterfalling over the edge and getting into the center of the cake.

Then once you cut open the sweet ring of delight, you get a different marbled looking section for every slice.

The mix of the angel food cake makes the cake lighter allowing you to eat a larger slice than you normally would. Or maybe this cake is just so good that I usually glutton myself a bit when eating it.
Friday, January 11, 2013
Berry Pie Cupcakes
For my friend's birthday, I wanted to make her some cupcakes that were a little bit different. I saw this in one of the Hello Cupcake! books and decided to give it a shot. My one problem was that I made the frosting a bit too liquidy, so it didn't decorate quite right. I also didn't put in any cocoa powder for coloring, but used dyes instead, so the color didn't come out quite right. I found some raspberry flavored M&Ms which made it easier to decorate normal looking berry pies.


Here's how mine came out. They were very tasty.

My one recommendation (other than making the frosting correctly) is to make them on the day you want to eat them, because the frosting will alter the color of the M&Ms if left overnight as seen in the above pictures.
Sunday, January 6, 2013
Baker's Death By Chocolate Cookie
My mom kept seeing the Baker's Chocolate advertisement for this cookie and finally decided that she wanted to try it. She got me all the ingredients and left them and the recipe with me. It's a fairly simple recipe and consists of about 70% chocolate, 20% nuts, and 10% of everything else required to make a cookie (flour, eggs, sugar, etc.). I can't say no to chocolate, so I got to work on it. The recipe requires two packages of the semi-sweet chocolate squares. My mom already had a box from a previous thing she made and only got me one additional box, so I was about 4 squares of chocolate short on my batch, but I don't think it made too much of a difference.


The cookies came out very close to the picture, which always makes me happy. They are very chocolaty and rich and definitely a keeper for my family. I highly recommend a glass of milk to go along with these. Or, if you are a chocoholic and cookie monster like my dad, then just eat them by the handful. However, if you eat them by the handful, just be aware that the recipe only makes about a dozen and a half cookies, although they are larger than my normal chocolate chip cookie size.

I also ran across an interesting find. The older chocolate box had a cookie that looked very similar to the one I was making, so I looked at the recipe for it on the back of the box.

It was the same recipe for the death by chocolate cookies under the name of chocolate chocolate chunk cookies. I'm on to you Baker's.
Friday, December 14, 2012
Sugar cookies decorated in the holiday spirit
I was asked to make the Christmas cookies for my family this year. I agreed and go to work. If you aren't interested in Christmas, I'm still showing some basic methods for decorating sugar cookies if you decide to make some in non Christmas shapes. Also, due to a lack of parental oversight and access to all the cookie cutters, a few non-Christmas related cookies snuck into the mix.


The first step is to get all your materials ready. For me this was pouring out multitudes of sprinkles without having them all end up scattered on the floor and then adhering to my feet.

Well, probably a better first step would be to bake off your cookies. Here they are stacked up and waiting to get their icing and sprinkles put on them. The amount here is about a double batch of my mom's recipe minus the dough at the end of the batch that got to stiff from flour and ended up as cooked blobs of frustration.
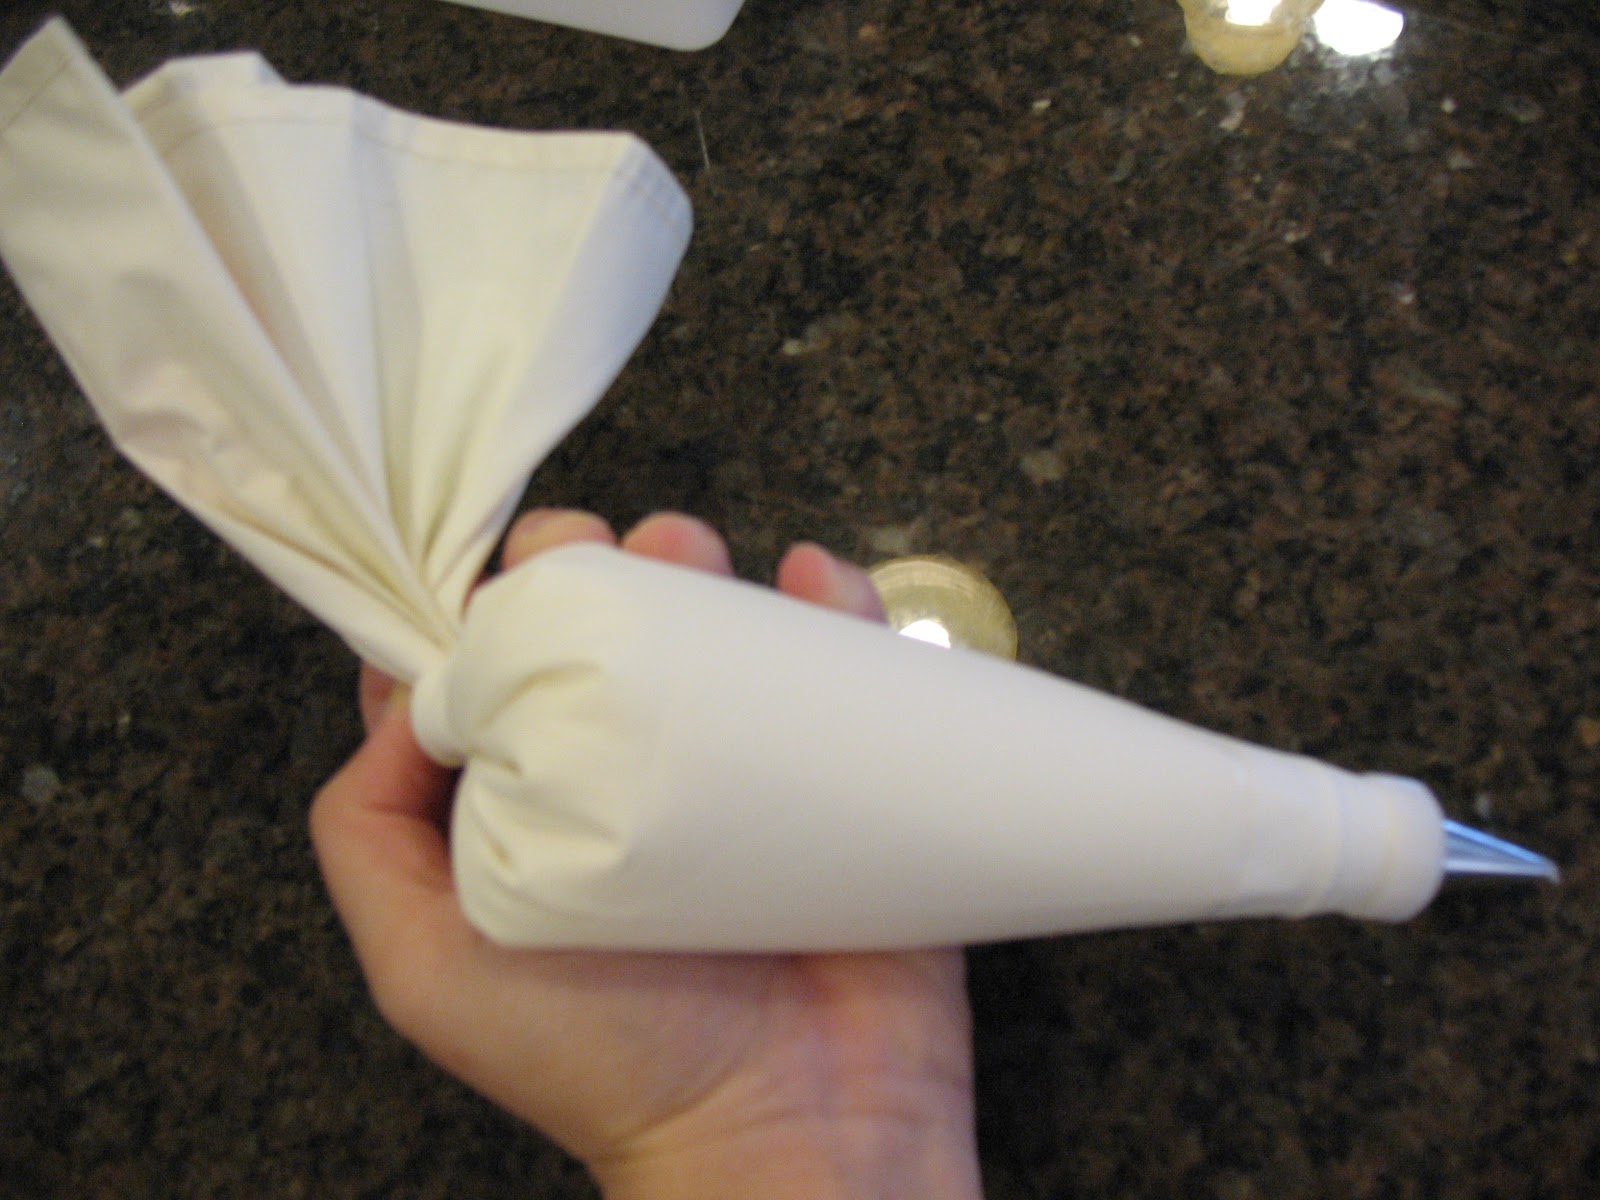
The next step is to get your frosting ready. The type I used is roughly 1 stick of butter, 1 lb. of powdered sugar, 1 tsp. vanilla extract, and just enough milk to keep it creamy. I put it in this baker's icing bag, because it makes it easier if you decide to do any fancier decorations and gives you more control. The main trick to it is to keep the end twisted, or you'll have frosting coming out all over your hands and arms and you're mom's holiday frustration level will go up another notch. If you don't think you have the ability to keep it twisted, a rubberband around the end can help. Also, if you squeeze from the twisted side, you have a lower chance of losing all your icing.

Next pick out your cookie. I started with this shape. Can you tell what it is already? No? Well, it isn't an oddly shaped fish, or at least I'm choosing to decorate it as something other than an oddly shaped fish.

Since we're dipping the cookies in sprinkles, you want to do all areas that will be the same color at the same time. It also isn't important to have a full cover in the areas like you see in the picture. When you press the cookie into the sprinkles, it will flatten and spread, so you need just enough to flatten or spread.

Here it goes into the red sprinkles.

At this point he's starting to look like Santa Claus.

Next I'm adding frosting for his bag of toys and his boots which will be the same color.

There we go. Now he just needs some finishing touches in white icing.

This is where the piping bag comes in really handy. I made loops on him, and also dots for his beard. This adds a little bit of texture to the cookie. I also gave him a sprinkle eyeball.

Here's a comparison of the start and the finish of one Santa Claus.

Once you get a hang of the basics, you can try different decorations. You can keep some things the same, make other's different. The limit is your imagination. Well, another limit would be your frustration with your piping skills, but practice will always make those better.

Here's some examples of how to try different things to the same cookie. You can make it more plain like the lower right hand cookie, or you can add cinnamon candies, dip it in another sprinkle to mimic the candies, or add a multitude of tiny pearl sprinkles that prefer to stick to your fingers, not the cookie. The trick is to always add icing before applying anything, because it is the glue that will hold it to the cookie.

Here's my candlesticks, candy canes (or fancy letter J) and tiny boots.

Here's a look at all my Santas and wreaths. I personally like my pimp of a Santa in his gold suit, but that's just me.

I don't know why, but all my angels usually come out looking weird. I've been decorating these shapes since I was around six years old and with many different attempts, I still can't make that angel look any better than this. Also, there all holly leaves here. I added the veins of the plant to make it look a bit different.

I like decorating the trees, because you can always put a base green layer on and then decorate them like you were decorating a real tree (sort of). I decided to go just with "garlands" and maybe you could consider the multicolored sprinkles lights. You can also add candy cinnamon pieces to be "ornaments."

Toy soldiers are fun to try to make them look like they are part of a real military branch. These ones don't. I did make a "camo" soldier, but his legs snapped off and I had to eat him.

Gingerbread houses, bears, and reindeer. I will admit at this point I was about five hours into decorating and I stopped caring as much how they looked. That's why there isn't too much variation in design.

On the right are what are supposed to be drums with drumsticks. Or maybe the underside of sleighs? I'm not sure, but they have come to be know as Christmas hotdogs to my family.

The trains and the gingerbread men were done at the point when I just wanted to be finished, so they got the easiest decorating design of a basic outline.

How did these get in here? ;-)

Bells.

Unfortunately for the snowmen, I was past wanting to be done and my back was hurting from hunching over the table. I usually do a more intricate design like the snowman in the red scarf, but my tiredness and the almost all gone frosting meant these guys were going to look a bit sad.
The final thing to finish these guys is to make sure that the frosting dries or hardens before you try to stack them. That's why I have them on cookie sheets to increase the amount of places I could store them while they dried. Also, a personal recommendation is to get your friends and family to come help you so you don't end up in a weird place after seven hours of decorating cookies where you are yelling at inanimate food objects for not listening to you while your body and house is covered in tiny sugar sprinkles. However, this may also be attributed to eating too many of the cookies and skipping dinner, so your blood sugar levels are way too high.
Subscribe to:
Posts (Atom)